A tribute camera build: The VaguelySwari transformation
If you have done searches on wooden view cameras, you've undoubtedly noticed the decorative Victorian-style cameras advertised on major outlets. They range in sizes from about 6 in. square at the base to 12 in. square, approximating 4x5, 5x7, and 8x10 cameras. Moreover, they seem to have most of the right parts and even have seemingly useful bellows. Could there be a project hidden within those crude lines? I am about to answer that conjecture!

Several home furnishing sites advertise the above camera. Photographers will notice that there is no focusing mechanism or actual shutter in front, and the photos of the back show only a textured glass representation of a focusing screen. But upon comparison with other British field cameras of the type depicted by this model, it appears to pay homage to a particular camera of the brand developed in India in the mid 1940s, the Vageeswari 8x10 camera.
Here is a representative photo of the real thing that I think was copied by street craftsmen at the Indian factory that ships this decor version. Note how the decor version copies the front standard outline, the metal flashing around the lensboard, and the rearward tilt of the support struts.

I figured that I could at least repurpose the potentially useful parts of this decor item for other camera projects. But to convert them as is into an actual, functional camera would be a nice challenge. In honor of the Vageeswari inspiration, we will try first to turn it into (I kid thee not) a veritable VaguelySwari camera!
The products in their various sizes are offered on eBay, Etsy, and Amazon. All are likely sourced from a single street factory in India given the common parts across models (compare their photos of the corner caps, the lenticular "ground glass", bellows material, streaked paint finish, and a wood or chrome tripod). All feature a front standard that plugs into the lower box to spread the bellows, with no pretense of a focusing mechanism. The prices vary across shopping platforms, but the cheapest one you can find is as good as any.
Honestly, the quality is best described as execrable. I will use that adjective a lot; start your drinking game now (drink!). It is good enough to look right from a distance but clearly rough on closer inspection.
I decided to get the largest form factor, described as a 12" x 12" x 12" dimension, because the metal parts seem to be realistically proportioned. The one I selected was on eBay with free shipping at a cost of $104. It arrived surprisingly quickly, via many tracking checkpoints from India to Cincinnati to Austin, where it languished for a few days in the handover process from DHL to USPS, and finally to my central Texas post office). The tripod and camera body arrived in separate cardboard packages, adequately swaddled in foam bits and thin bubble wrap.

First setup... yes, it's just for looking at.
What I got was a decent representation of an 8" x 10" British-style field camera, with the front standard inspired by the iconic uprights and chrome fittings of the Vageeswari brand of view camera. It came with no instructions, but it was clear how to set it up quickly for display.
But my goal was to turn this Hot Mess into A Real Camera, as nearly as possible. I'll save the tripod for later consideration ... it has usable pieces but no real tripod head, so it is not practical without major rework.
Assessment
First the good news. The camera body truly closes and flexes like a real camera. The stamped metal struts are actually functional, although a bit thin. The bellows is short but usable if darkened.
On the minus side, this body has no actual plate holder board, no actual focusing mechanism, and no actual front standard with a lens board. Many of the parts are merely decorative, or barely functional as intended in actual use.
For example, furniture brads were used to attach many parts. I used a box cutter knife to start a gap under the head, then used a staple remover to pry out each brad. All the screws were cheaply made and required patience to back out. The thumb screw tips were ragged and had to be filed flat for firmer attachment.
Camera Alterations
The rear standard is just a wooden case with a useless lenticular "ground glass." The inner interface between the bellows and the plate adapter side was of execrable (drink!) splintery wood. My fix was to detach the bellows so that I could replace the bad wood with a cleaner rim that defined a 10" by 10" film gate. After this repair, I was able to add a rotatable adapter to accept film holders and a proper ground glass.
The bellows were just four trapezoid-shaped pieces of card stock glued beneath a thin textured fabric. The folded seams were not at all light tight, and the cone was not at all square. The cone was glued to both standards using contact cement. I separated it by carefully prying with a small painter's spatula. Where it was glued to the front standard, the fit was visibly skewed; you might say execrable (drink!). But I decided the bellows could be flattened and re-lined with black fabric so as to restore them to usefulness. The folds are still wonky, but that will just be a silent homage to the concept of "putting lipstick on a pig."


The original Vageeswari camera uses an extendable frame to advance the front standard in the bed. The front standard has hinges and uprights that hold the interface plate with bellows on one side and the lens holder on the other. When loosened, the standard folds into the bed and the lens board drops in reverse between the laid-down uprights for closing. All this is missing on the display item.
To prepare the base for its new focuser, I had to cut out the front and back sides of the base box to expose the bed. I attached sections of bookshelf clip rails as guides for a sliding frame. I finished the focuser by fitting a wooden frame snugly between the guides, and tapped a hole for a setscrew to hold this focusing frame in place after focusing.
I replicated the original standard uprights, grooved their inside lips, and jointed them to a lower crosspiece. I attached this U-shaped assembly to the tray with jewelry box hinges and with the salvaged struts.
The width of the lens/bellows interface depends on the size of the lens board/ bellows interface. I decided to go with a 4" square by 3/16" standard lens board for interchangeable lenses, and then built a "reverse picture frame" for the lensboard to mount into. I used tabs from a dollar store picture frame to lock in the lens board. This lensboard frame slides between the uprights to form the full front standard.
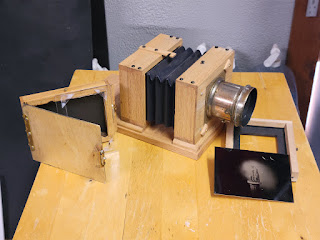
At this point in my reconstruction work, things were looking much better. I created a rotatable film back that accepts either a ground glass insert or an actual 8x10-sized film/plate holder. Conceptually, the project was now functional.


Extras
I plan to use a 10-32 threaded rod for focusing, with a split nut on a clothespin to allow gross movement of the focus.
The "lens" is merely a similar chromed cup with a circle of plain glass glued in with that execrable (drink!) contact cement. I could not remove the glass without breaking it, but no great loss. I may mount a binocular objective of about 300mm focal length or so in it and mount it to a lens board. This could make some dreamy hazy photos on the cheap. But since I can mount my much better12" brass lenses now, that is a distant project.
The chromed corners that held in the replica ground glass are not actually useful in the camera itself. They would look nice on the lid of a carry case--someday.
At this point, the camera looks complete enough to be put to use. I have not yet made test shots as I immediately started a new Spring project of a 16" x 20" studio camera. More to come on that!
Thoughts on the VaguelySwari conversion
I don't think I would do another such rebuild. This was a fun project to prove a point, but, in the end, the VaguelySwari camera is basically an object of wonder and misgivings. Now that I have these parts, I'd rather make a new camera body of walnut with traditional box joints, and then improve on the bellows and the rest of the construction. But this conversion does work, and I plan to create some demo compositions using it in the near future.
If this foray into madness was not entirely practical or justifiable, at least it was entertaining, and I have new respect for the venerable Vageeswari camera design.

Comments
Post a Comment