
The Blinds Shall See
So you want it Good, Cheap, and Big? "Pick two and call me back." But I love interesting challenges, which led to my largest wooden camera project, yet: a 20"x20" folding wooden field camera.
How the idea hatched

In the big box hardware store, I spotted some paper blackout blinds, which kind of look like bellows (if you squint and use your imagination). At 72 inches of length, bellows made from these would have a useful extension. At 48" of width, one set can be folded into the equivalent of two 21" sides with 6" extra for an overlapped seam (two of these make up all 4 sides). And with a 1" fold width, the joined set should fit inside a 22" square camera body with full illumination on a 20x20" field. Interesting! Ok, challenge accepted; let's see if I can demo this premise as cheaply as possible.
The Process

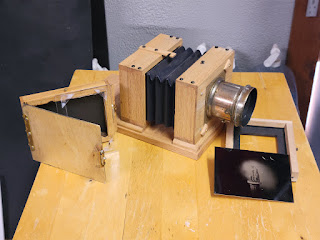
I have a 21.5" f/11 Kodak process lens that will more than cover the full 20x20" field, so this became my initial design guidepost. Since the intended bellows material is pre-folded in parallel one-inch strips, a cone-shaped bellows is not possible (the folds for such must have a short and a long aspect that determines the rise over run for the cone). The camera body is necessarily square, so it has an undeniable studio camera form factor. But with light materials and an open focusing bed design, the camera can be folded for storage and portability. The relatively flat and stable spruce wood known as Gorman trim became my main choice of material for holders and structure. Thin but sturdy pine scraps in my cut-offs bin were just large enough to make a box that I could divide into front and rear standards, with a tilting rear standard for a degree of vertical tilt.
While the boxes came together rather easily, the focusing base required more thought. I ended up with a short front base that supports the front standard, just long enough to park the expected collapsed thickness of the bellows and boxes. This hinges onto a light rear track with a slotted center rail for tail focusing. The front standard began with an uncut square of oak veneered plywood, but I soon decided to enable a bit of vertical shift, given the huge coverage of the process lens. The rise slider is still a work in progress; I'll need to provide a sort of internal bag bellows behind the sliding front to cover the gap when the lens assembly is raised or lowered relative to the fixed front standard.


I also worked out how to fold the bellows using the traditional square-cornered fold. I settled on a U shape so that the two halves could be seamed more easily. Distressingly, I found out after folding the first blind that a folded side tends to end up slightly longer than measured, so the fit into the standard was fiddly and clearly needed a stiffener frame.
The final items needed to make the camera functional were a universal back, a ground glass frame, and a media holder. I had decided by now that I would try to model a more modern 16x20" film holder with a rotating back rather than a square holder with rotating inserts. At least if I trash the camera after I prove the folly of the bellows, I can reuse the back in a more modern field camera do-over.

Although I had started with a bail-based ground glass lifter, I decided the separate focusing frame would be sturdier in field use. After these paper bellows wear out, perhaps the field camera do-over with cone bellows will use the bail lifter.


The ground glass frame was straightforward, using half-lap joints, and routed to a focusing depth (T-distance) of 11/32" (near 0.34375", a standard I can repeat using gauge blocks for setup). I tested a method of milling a double sheet paper holder with a septum, but decided to make the first media holder be for wet plate collodion. The frames are 3/4" thick, 18" wide, and about 25" long, with a proper baffle and rib lock. In hindsight, the wet plate design is actually more work in setup since front and back profiles are different rather than symmetrical. But the result is functional and seems to match the ground glass inset for focus. I think my mantra for this project should be like the political re-election motto: Next time will be better.
With all the major components glued and sanded, I gave them all a coat of Red Chestnut stain (which works well with the grain in pine and spruce species), and finished with two spray cans of Clear Paint from Dollar General. Didn't I say this project would be cheap and big? The "good" merit is more subjective.

Final Assessment


Now I just need to make an actual photo with the camera. But I don't have room for large trays in my darkroom at the moment, so my quest is done for now. Using this camera will require a small table for setup... it is too wind-sensitive to dare setting onto any of my tripods. I will not bother to finish seaming the overlaps in the joined bellows... tape has held them together well enough for this demo.
Having done all this just to fulfill a wild hair impulse to turn window blinds into square bellows... was the construction part of the project worth it?
Absolutely! I enjoyed the challenge, was able to improve my setup and design experience, and ended up with a modular architecture that I can apply to other large models (and a field camera design is definitely in my plans).
Lessons Learned
- The square bellows were sized to exactly fit the cavity of the tail standard. But after I decided to split the box to enable rear tilting, the joined bellows are now in tight contact with the fixed part of the standard, where flexure is needed for ease of tilting. Take-away: square bellows should not fit so exactly in the camera body. This issue will be completely absent once I redesign the front standard for reducing bellows. Since I will likely never again build bellows out of window blinds, I'm just logging an observed design consideration.
- Speaking of paper blind bellows, I was able to successfully demonstrate my premise, and the camera that resulted is absolutely usable as is. But I will move on from this premise for these reasons:
- The corners were easy to fold, but it was hard to flatten the assembly to draw and fold the corner lines (essentially, establishing the inner width of the bellows). I ended up squeezing the unit tightly and using a white marker to trace across the folds. This left a white dot every two inches that I could use for reference while folding.
- The folded corners are frankly too stiff for relaxed flexing of the bellows. They tend to hold formation until forced apart, versus separating evenly across all the folds. Pulling out the bellows for setup starts off looking like a bad haircut and cowlicks combined.
- Even though the paper these blinds are based on is as firm as card stock, the folds create tension points that wear easily. The right solution, of course, is to make proper bellows using flexible substrate with individual ribs glued in place.
- On the positive side, this material IS an excellent and cheap-for-the-amount source for already light-proof and sturdy ribs up to 1 inch of width and 48 inches of length.
- In general, the studio form factor for retro cameras has little benefit for any current and practical design. The economy of square bellows makes sense for repro cameras, but historically this was a phase that matters today only for vintage reproductions or cheap and easy ULF quick builds (being mindful of the previous issues). On the "Good, Cheap, and Big" challenge, this material will give you the Quick and Cheap, but Good is definitely the tradeoff you'll have to accept.
- For focusing, I just relied on manually nudging the rear standard to and fro. A practical focusing bed should provide either geared or threaded movements.
- For my next iteration, I will will adapt the back into a field camera design with fabric-based cone bellows.
Fascinating! I look forward to the next iteration.
ReplyDelete